Search

Main page >  Ice Cream Recipes  >  The Berries Collection > Strawberry >  with egg yolks

Featured image for the recipe: an ice cream maker bowl filled with strawberry ice cream ans a scoop with strawberry ice cream on it

THE FRENCH-STYLE ICE CREAM

Strawberry Ice Cream | with egg yolks (custard)

Strawberry
Ice Cream
· with egg yolks (custard) ·

With strawberries, milk, cream, sugar, and egg yolks.

This is a French-style ice cream which means that it contains egg yolks cooked with milk over the stovetop to make a custard. Making a custard is a little tricky but worth the effort for the velvety ice cream it creates.

Just like all our ice cream recipes, this is not your typical strawberry ice cream: this is Strawberry Ice Cream at its best, with a refreshing strawberry flavour and a popping pink colour, thanks to an unusual method we have for preparing the fruit for ice cream making: instead of cooking the strawberries, we macerate them in the sugar for a few hours. This simple process brightens their flavour, reduces the acidity and softens their flesh, making for a perfect ice cream body and strawberry flavour.

3 more ways to make a strawberry ice cream:

THE EASY! Crowd-pleasing and easy to make. Eat now, thank us later. With strawberries, milk, cream, and sugar.

THE ITALIAN WAY. This is your hot weather ice cream: easy to make, and resistant to melting. Perfect for popsicle moulds, too.  With strawberries, milk, cream, sugar, and corn starch.

LIKE A PRO. The closest you can get to store-bought ice cream with just one extra ingredient: xanthan gum. With strawberries, milk, cream, sugar, xanthan gum.

THE EASY! Crowd-pleasing and easy to make. Eat now, thank us later. With strawberries, milk, cream, and sugar.

THE ITALIAN WAY. This is your hot weather ice cream: easy to make, and resistant to melting. Perfect for popsicle moulds, too.  With strawberries, milk, cream, sugar, and corn starch.

LIKE A PRO. The closest you can get to store-bought ice cream with just one extra ingredient. With strawberries, milk, cream, sugar, xanthan gum.

or see:

The ingredients

Do not reduce or replace anything; everything is there for a reason.

• Fresh strawberries: prefer to use fresh, juicy, in-season strawberries. The taste of this strawberry ice cream will be determined by the taste of the strawberries themselves. If you want a fragrant strawberry ice cream, so should be your strawberries.

• Milk: use whole milk; this has approx. 3,5% fat. Do not substitute with skimmed milk (lower fat) or non-dairy milk. You need both the fat and the milk proteins for this ice cream recipe.

Egg yolks: prefer to use eggs in the range of 65 – 75 g; 2.3 – 2.65 oz , (this is the weight of a whole egg, in its shell). It is easier to separate the egg yolks from the whites when the eggs are cold.

• Heavy cream (for double cream read below): for this recipe you can use heavy cream with 35% to 40% fat content. It is ok to use cream suitable for whipping or ultra-pasteurised cream with 35-40% fat content. Do not use low-fat cream or non-dairy cream.

Sugar: only use regular sugar (white granulated sugar). 

Do not use any other sugar or sweetener, natural or artificial, liquid or powder, like honey, stevia, golden syrup, table sweeteners, confectioner’s sugar, etc.

🇬🇧 For UK readers: if you want to use double cream -which has a higher fat content (50%) than heavy cream (35-40% fat)- stir some milk into the double cream to bring it to the right fat content. Instructions in double cream – how to use”.

• Fresh strawberries: prefer to use fresh, juicy, in-season strawberries. The taste of this strawberry ice cream will be determined by the taste of the strawberries themselves. If you want a fragrant strawberry ice cream, so should be your strawberries.

Egg yolks: prefer to use eggs in the range of 65 – 75 g; 2.3 – 2.65 oz , (this is the weight of a whole egg, in its shell). It is easier to separate the egg yolks from the whites when the eggs are cold.

Sugar: only use regular sugar (white granulated sugar). 

Do not use any other sugar or sweetener, natural or artificial, liquid or powder, like honey, stevia, golden syrup, table sweeteners, confectioner’s sugar, etc.

• Milk: use whole milk, with around 3,5% fat. Do not substitute with skimmed milk (lower fat) or non-dairy milk. You need both the fat and the milk proteins for this ice cream recipe.

• Heavy cream (for double cream see scroll to the right): for this recipe you can use heavy cream with 35% – 40% fat. It is ok to use cream suitable for whipping or ultra-pasteurised cream with 35-40% fat content.

Do not use low-fat cream or non-dairy cream.

🇬🇧 For UK readers: if you want to use double cream -which has a higher fat content (50%) than heavy cream (35-40% fat)- stir some milk into the double cream to bring it to the right fat content. Instructions in double cream – how to use”.

Overview

This is a quick overview of the recipe. If you are new to ice cream making, do read the recipe before proceeding. 

In a bowl stir together the chopped strawberries with 1/3 of the sugar.

Let them macerate for 2-3 hours at room temperature until the sugar dissolves. Stirring occasionally speeds up the process.

A red syrup will begin to form.

Make the custard: warm the cream with the rest of the sugar until hot and steamy and pour over the egg yolks, whisking contintuously.

Return to the heat and cook over medium heat until thickened, stirring continously.

Cool down the custard over an ice bath.

Put the strawberries and the custard in the refrigerator overnight; or until completely cold.

Blend the strawberries until smooth.

Add the custard and blend to combine.

Churn the cold blend until fluffy and creamy.

Put it in the freezer for a few hours to set. 

As soon as it sets, you can either serve it from the ice cream maker bowl or transfer to a container and store it in the freezer.

The recipe

Strawberry Ice Cream | with egg yolks

Strawberry Ice Cream
• with egg yolks •
Ingredients:
Notes:

Frozen strawberries should be defrosted and at room temperature before using in the recipe. Keep any water they release during thawing; it is part of the recipe.

When making ice cream prefer to weigh all the ingredients by weight. We also recommend weighing the liquids directly into the bowl/pan as you proceed with the recipe instead of transferring them from one bowl to another because this transfer causes a small -but unwanted- loss of quantity.

If you do not have a kitchen scale, follow these guidelines:
• 1 cup (US) = 237 ml | 1 Tbs. = 15 ml

• strawberries: measuring the strawberries in a cup is not recommended because the results vary depending on the size of the strawberries. If you do not have a scale, you can have them weighted at the grocery store, or estimate how many you need from the net weight, as given on the packaging

• sugar: measuring sugar in tablespoons is more accurate than measuring it in cups. Use a 15 ml measuring tablespoon (not a regular one); this is 13 gr of sugar. To measure correctly, each time you scoop the sugar, level it with the flat side of a knife.

Note that the quantities in each measuring system (grams, ounces, and cups) in our recipes may not always be accurate conversions; any deviations in conversions you may notice do not affect the outcome.

This recipe makes a 1.2 litre/quart ice cream mixture (before churning), perfect for ice cream makers with a capacity of 1.5 and up to 2 litres/quarts (like Cuisinart ice cream makers).

If you need to scale the ice cream mixture up or down, use this ratio of the ingredients (in weight only):

strawberries 39.8% / heavy cream 37.9% / sugar 14.3% / egg yolks 8% 

in desired total weight of ice cream mixture.

For example, if you want to make 1000 g of ice cream mixture, you need:

  • 1000 g x 39.8% = 398 g hulled strawberries
  • 1000 g x 37.9% = 379 g heavy cream
  • 1000 g x 14.3% = 143 g sugar
  • 1000 g x 8% = 80 g egg yolks

You can combine double cream with whole milk to make heavy cream for this recipe.

To make 475 g (16.8 oz) heavy cream, stir together:

  • 335 g double cream (11.7 oz) (with approx. 50% fat)
  • 140 g whole milk (5.1 oz) (with approx. 3.5% fat) 

The resulting heavy cream has 36% fat, perfect for this ice cream. Proceed with the recipe just as if you had the 475 g (16.8 oz) heavy cream needed. 

A flexible rubber spatula is good for:
-wiping the bottom of the saucepan when you cook dairy on the stovetop.
-scraping residues from bowls, saucepans etc.

If you do not have one, we strongly encourage you to buy one, preferably a flexible one. 

Instructions
Plan ahead:

The strawberriess and the custard need to cool completely before blending and churning, so prepare them in advance (approx. 8 hours before) to give them time to chill in the refrigerator. 

If your ice cream maker has a removable freezer bowl, put it in the freezer for the whole time indicated by the manufacturer before churning, usually 24 hours.

Step 1: Prepare the strawberries

Slice the strawberries: with a sharp knife, cut the strawberries (500 g; 17.6 oz) into clean, neat slices. No need to cut them very thin; just slice them to a thickness you feel comfortable with.

Mix the strawberries with part of the sugar: in a large bowl, put the strawberry slices and 100 g of the sugar (3.5 oz; 8 tablespoons). Stir with a rubber spatula, leaving the spatula in the bowl.

Macerate the strawberries: leave the strawberries to macerate at room temperature for 2-3 hours (or more if the strawberries are cold from the fridge). Stir every hour or as needed to help the sugar dissolve. Each time you stir, scrape the sugar that sits on the bottom and sides of the bowl and mix it in the strawberries. 

Step 2: Make the custard

Place a rubber spatula and a whisk on a plate next to the stovetop to have them ready to use interchangeably.

Prepare the egg yolks: put the egg yolks (5 egg yolks) in a medium bowl, and whisk them lightly to break them down. Set the bowl next to the stovetop.

Warm the heavy cream: put the heavy cream (475 g; 16.8 oz) and the rest of the sugar (80 g; 2.8 oz; 6 tablespoons) in a medium saucepan and warm over medium heat, stirring often, until the cream is hot and steamy and the sugar dissolves (this is at 75° C / 167° F if you have a thermometer)

Temper the egg yolks: remove the saucepan from the heat and slowly pour roughly half of the warm cream over the egg yolks with one hand while whisking them vigorously with the other hand to temper them.

Cook until thickened: pour the tempered yolks & cream back into the saucepan and over medium-high heat. Cook, constantly stirring with a rubber spatula and scraping the bottom of the saucepan to prevent the custard from scalding. Maintain a medium temperature, do not let it come to a boil.

Remove from the heat when the custard starts to thicken (82ºC / 179 ºF / when it thickens to coat the back of a spoon / when you tilt the saucepan, a layer of thickened custard appears to form on the bottom).

Pour the custard through a fine-mesh sieve and into a heatproof bowl; stir to combine.

Step 3: Chilling

Cool down the custard: prepare an ice bath by putting the bowl with the custard into a larger bowl and filling the empty sides with ice cubes and cold water. How many ice cubes? A tray of ice cubes (200 g; 7 oz of ice) is enough to cool down the custard: we just need to cool it down until it is no longer warm to the touch so that you can safely put it in the refrigerator. It will take approx. 30 minutes; do stir occasionally.

Check the strawberries for undissolved sugar: check the bottom of the bowl with the strawberries and if you see any sugar granules, give it a vigorous, focused stir with the spatula, aiming to dissolve the sugar; if needed, leave it at room temperature for some more. All the sugar must dissolve before putting the strawberries in the refrigerator.

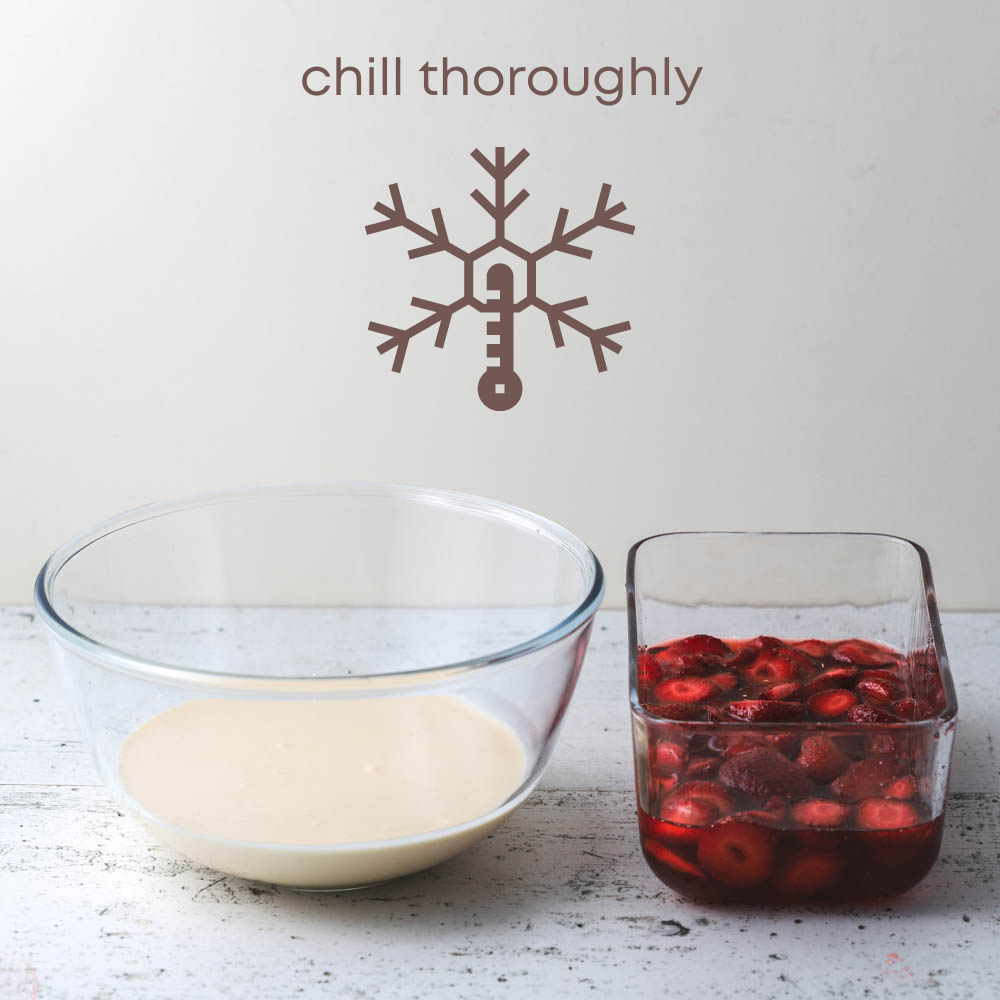
Chill until completely coldcover the bowl with the custard and the bowl with the strawberries and refrigerate for at least 8 hours. The strawberries keep up to 24 hours in the refrigerator, whereas the custard keeps up to 3 days. 

When churning with a domestic ice cream maker, the ice cream mixture must be fridge-cold (4ºC–12ºC / 39ºF-54ºF / it feels fridge-cold when you place your index finger into it).

If the ice cream mixture is not cold enough, the ice cream maker may not be able to churn it to its fullest potential, resulting in a sloppy liquid vs. fluffy ice cream.

Step 4: Churn the ice cream

Blend the strawberries: with a slotted spoon, remove the cold strawberries from their syrup, and put them in the blender jug. Blend until smooth, pouring some strawberry syrup to get things going, if needed. When it is completely smooth, pour in the rest of the strawberry syrup and blend to combine.

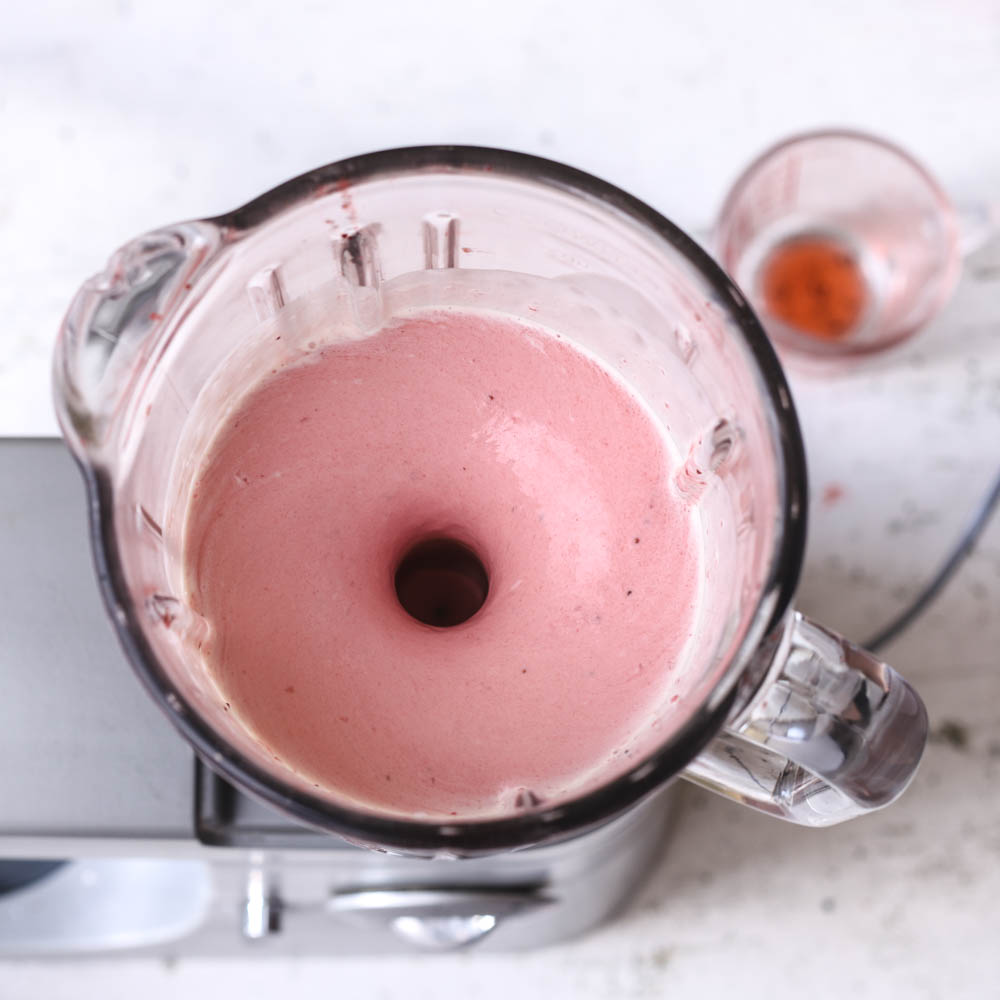
Gradually add the cold custard, blending as you go. Blend until it is a uniform pink colour with no streaks; stop the blender and scrape with the rubber spatula the insides of the blender jug as needed.

Prepare the ice cream maker according to the manufacturer’s instructions.

Churn: with the machine running, pour the cold blended strawberry mixture through the canister and into the ice cream maker.

Leave to churn until fluffed up and creamy; depending on your ice cream maker, this can take anywhere from 30-60 minutes.

This ice cream will expand and fluff up during churning. It is ready when it looks smooth and fluffy, with the consistency of soft-serve ice cream. The total churning time depends on your ice cream maker and could be anywhere from 30-70 minutes.

To evaluate if it is ready, lift a spoonful; it should be thick enough to stand on the spoon, but it will still be soft like soft-serve ice cream. If it looks watery or starts to melt the moment you spoon it, leave it to churn for longer.

In any case, if you feel doubts about the consistency, leave it to churn for ten minutes more. But beware: at this stage, do not expect it to be like store-bought carton ice cream; for now, it should be more like soft-serve ice cream. It will firm up and become like store-bought ice cream only after it sets in the freezer.

So, stop the ice cream maker when thick and creamy, as described above. If you leave it to churn for much longer, it will start turning grainy.

Note that some ice cream makers are programmed to stop after a specific time, which doesn’t make sense because the ice cream may need to churn for more to reach its fullest potential. So, if you notice that your ice cream maker stops on its own and upon checking the ice cream, you find that it is sloppy instead of fluffy, try to turn the machine on again and leave it to churn until it reaches the desired texture.

Step 5: Put the ice cream in the freezer to set

Put in the freezer to set: before serving the ice cream or moving it to a container for storing, you have to put it in the freezer to set. To do so, turn off the ice cream maker and: 

· remove the removable freezer bowl (still filled with the ice cream) from the ice cream machine
· remove the paddle, scraping any ice cream attached to it back into the ice cream bowl 
· place it in the freezer, uncovered
Setting time depends on many factors; see notes below for indicative times.

Serve or store: when it sets, you can serve it directly from the removable freezer bowl or transfer it to an airtight container for longer storage.

The setting time for the ice cream largely depends on the type of ice cream maker you use.

It can take:

  • 3-5 hours for removable freezer bowls (these are the ice cream maker bowls which you should pre-freeze before churning)
  • 1-2 hours for aluminium bowls (these are the bowls from compressor ice cream makers)

Note: the times given are indicative.

Setting time depends on many factors.

Check it occasionally (approx. every 1-2 hours: or as needed) while it is in the freezer. The ice cream is ready when it has an internal temperature of -11°C / 12°F. If you do not have a thermometer, to check if the ice cream has set, insert a round tip knife into it, all the way to the bottom:

  • when the ice cream is ready, it feels firm as you go down, but at the same time, it is soft enough to insert the knife into it; it should be firm and with the same consistency from top to bottom.
  • not ready yet: it may feel hard on the top and softer as you go down
  • if left in the freezer for too long: it will be too hard to insert the knife into it; and likely too hard to scoop out of the ice cream bowl. In this case, click on the next bulb to see how to make it scoopable again.

If the ice cream stays in the removable freezer bowl for too long, it will become too hard to remove or serve.

To make it scoopable again, leave it in the refrigerator to soften. That can take:

  • anywhere from 4 to 10 hours for removable freezer bowls (these are the ones which need pre-freezing before churning)
  • 1-2 hours for aluminium bowls (these are the bowls from compressor ice cream makers)

(Note: the time given is indicative, time may vary depending on many factors, so do check it occasionally as it sits in the refrigerator.)

When the ice cream is soft enough to scoop (or it has an internal temperature of approx. -11°C /12°F if you have a thermometer), you can transfer it to another container and store it in the freezer or serve it directly from the freezer bowl.

Straight after churning, the ice cream has a soft-serve ice cream consistency and melts immediately upon contact with anything. So it is too messy to serve or transfer to another container.

Putting it in the freezer after churning sets it and brings it to the right consistency: scoopable and easy to serve or transfer to another container to store it.

Storing and serving

Storing: in the freezer for one month, covered well to protect it from absorbing the freezer’s smells. 

Scooping: this ice cream, like all artisanal ice cream, freezes hard in the long term. You can make it perfectly scoopable again by putting it in the refrigerator for 45-60 minuter until soft; or until its internal temperature reads -11°C / 12°F.

Instructions

The strawberriess and the custard need to cool completely before blending and churning, so prepare them in advance (approx. 8 hours before) to give them time to chill in the refrigerator. 

If your ice cream maker has a removable freezer bowl, put it in the freezer for the whole time indicated by the manufacturer before churning, usually 24 hours.

Slice the strawberries: with a sharp knife, cut the strawberries (500 g; 17.6 oz) into clean, neat slices. No need to cut them very thin; just slice them to a thickness you feel comfortable with.

Mix the strawberries with part of the sugar: in a large bowl, put the strawberry slices and 100 g of the sugar (3.5 oz; 8 tablespoons). Stir with a rubber spatula, leaving the spatula in the bowl.

Macerate the strawberries: leave the strawberries to macerate at room temperature for 2-3 hours (or more if the strawberries are cold from the fridge). Stir every hour or as needed to help the sugar dissolve. Each time you stir, scrape the sugar that sits on the bottom and sides of the bowl and mix it in the strawberries. 

Place a rubber spatula and a whisk on a plate next to the stovetop to have them ready to use interchangeably.

Prepare the egg yolks: put the egg yolks (5 egg yolks) in a medium bowl, and whisk them lightly to break them down. Set the bowl next to the stovetop.

Warm the heavy cream: put the heavy cream (475 g; 16.8 oz) and the rest of the sugar (80 g; 2.8 oz; 6 tablespoons) in a medium saucepan and warm over medium heat, stirring often, until the cream is hot and steamy and the sugar dissolves (this is at 75° C / 167° F if you have a thermometer)

Temper the egg yolks: remove the saucepan from the heat and slowly pour roughly half of the warm cream over the egg yolks with one hand while whisking them vigorously with the other hand to temper them.

Cook until thickened: pour the tempered yolks & cream back into the saucepan and over medium-high heat. Cook, constantly stirring with a rubber spatula and scraping the bottom of the saucepan to prevent the custard from scalding. Maintain a medium temperature, do not let it come to a boil.

Remove from the heat when the custard starts to thicken (82ºC / 179 ºF / when it thickens to coat the back of a spoon / when you tilt the saucepan, a layer of thickened custard appears to form on the bottom).

Pour the custard through a fine-mesh sieve and into a heatproof bowl; stir to combine.

Cool down the custard: prepare an ice bath by putting the bowl with the custard into a larger bowl and filling the empty sides with ice cubes and cold water. How many ice cubes? A tray of ice cubes (200 g; 7 oz of ice) is enough to cool down the custard: we just need to cool it down until it is no longer warm to the touch so that you can safely put it in the refrigerator. It will take approx. 30 minutes; do stir occasionally.

Check the strawberries for undissolved sugar: check the bottom of the bowl with the strawberries and if you see any sugar granules, give it a vigorous, focused stir with the spatula, aiming to dissolve the sugar; if needed, leave it at room temperature for some more. All sugar must dissolve before putting the strawberries in the refrigerator.

Chill until completely coldcover the bowl with the custard and the bowl with the strawberries and refrigerate for at least 8 hours. The strawberries keep up to 24 hours in the refrigerator, whereas the custard keeps up to 3 days. 

Blend the strawberries: with a slotted spoon, remove the cold strawberries from their syrup, and put them in the blender jug. Blend until smooth, pouring some strawberry syrup to get things going, if needed. When it is completely smooth, pour in the rest of the strawberry syrup and blend to combine.

Gradually add the cold custard, blending as you go. Blend until it is a uniform pink colour with no streaks; stop the blender and scrape with the rubber spatula the insides of the blender jug as needed.

Prepare the ice cream maker according to the manufacturer’s instructions.

Churn: with the machine running, pour the cold blended strawberry mixture through the canister and into the ice cream maker.

Leave to churn until fluffed up and creamy; depending on your ice cream maker, this can take anywhere from 30-60 minutes.

Put in the freezer to set: before serving the ice cream or moving it to a container for storing, you have to put it in the freezer to set. To do so, turn off the ice cream maker and: 

· remove the removable freezer bowl (still filled with the ice cream) from the ice cream machine

· remove the paddle, scraping any ice cream attached to it back into the ice cream bowl 

· cover the ice cream bowl and place it in the freezer 

Setting time depends on many factors; read How long does it take for the ice cream to set in questions & troubleshooting below.

Serve or store: as soon as it sets, you can either serve it directly from the removable freezer bowl or transfer it to an airtight container for longer storing. 

Storing: in the freezer for one month, covered well to protect it from absorbing the freezer’s smells. 

Scooping: this ice cream, like all artisanal ice cream, freezes hard in the long term. You can make it perfectly scoopable again by putting it in the refrigerator for 45-60 minuter until soft; or until its internal temperature reads -11°C / 12°F.

This ice cream will expand and fluff up during churning. It is ready when it looks smooth and fluffy, with the consistency of soft-serve ice cream. The total churning time depends on your ice cream maker and could be anywhere from 30-70 minutes.

To evaluate if it is ready, lift a spoonful; it should be thick enough to stand on the spoon, but it will still be soft like soft-serve ice cream. If it looks watery or starts to melt the moment you spoon it, leave it to churn for longer.

In any case, if you feel doubts about the consistency, leave it to churn for ten minutes more. But beware: at this stage, do not expect it to be like store-bought carton ice cream; for now, it should be more like soft-serve ice cream.

It will firm up and become like store-bought ice cream only after it sets in the freezer.

So, stop the ice cream maker when thick and creamy, as described above. If you leave to churn it for much longer, it will start turning grainy.

Warning: some ice cream makers are programmed to stop after a specific time, which doesn’t make sense because the ice cream may need to churn for more to reach its fullest potential. So, if you notice that your ice cream maker stops on its own and upon checking the ice cream, you find that it is sloppy instead of fluffy, try to turn the machine on again and leave it to churn until it reaches the desired texture.

The setting time for the ice cream largely depends on the type of ice cream maker you use.

It can take :

  • 3-5 hours for removable freezer bowls (these are the ice cream maker bowls which you should pre-freeze before churning)
  • 1-2 hours for aluminium bowls (these are the bowls from compressor ice cream makers)

Note: the times given are indicative. Setting time depends on many factors.

Check it occasionally (approx. every 2 hours; or as needed) while it is in the freezer. The ice cream is ready when it has an internal temperature of -11ºC / 12ºF. If you do not have a thermometer, to evaluate if the ice cream has set, insert a round tip knife into it, all the way to the bottom: 

  • when the ice cream is ready, it feels firm as you go down, but at the same time it is soft enough to insert the knife into it; it should have this same firm consistency from top to bottom.
  • not ready yet: it will feel hard on the top and softer as you go down
  • if left in the freezer for too long: it will be too hard for the knife to insert into it and too hard to scoop out of the ice cream bowl. Do not worry, though! Read right below how to soften it.

Straight after churning, the ice cream has a soft-serve ice cream consistency and melts immediately upon contact with anything. This makes it impossible to serve or transfer to another container.

Putting it in the freezer after churning sets it and brings it to the right consistency, similar to that of an ice cream parlour’s.

If the ice cream stays in the removable freezer bowl for too long, it will harden and be difficult to remove or serve.

To make it scoopable again, leave it in the refrigerator to soften. That can take:

  • anywhere from 4 to 10 hours for removable freezer bowls (the ones which need pre-freezing before churning)
  • 1-2 hours for aluminium bowls (these are the bowls from compressor ice cream makers)

(Note: the time given is indicative, time may vary depending on many factors, so do check it occasionally as it sits in the refrigerator.)

When the ice cream is easy to scoop (or it has an internal temperature of approx. -11°C / 12°F if you have a thermometer), you can transfer it to another container and store it in the freezer or serve it directly from the removable freezer bowl.

Leave a Reply

Your email address will not be published. Required fields are marked *

This site uses Akismet to reduce spam. Learn how your comment data is processed.