Search

Main page >  Ice Cream Recipes  >  The Chocolate Collection > White Chocolate >  with xanthan gum

Featured photo for White Chocolate Ice Cream with xanthan gum recipe

THE LIKE-A-PRO ICE CREAM

White Chocolate Ice Cream
• with xanthan gum •

White Chocolate
Ice Cream
· with xanthan gum ·

With white chocolate, milk, heavy cream, sugar, and xanthan gum.

With the most white chocolate an ice cream batch can take in, this white chocolate ice cream bursts with white chocolate flavour, while keeping our high standards of mouthfeel pleasure. 

Xanthan gum makes for ice cream with a perfect, full-bodied mouthfeel, which churns beautifully, melts uniformly during serving, and keeps well in the freezer.

No xanthan gum? Here are 3 more ways to make this white chocolate ice cream:

THE EASY! Crowd-pleasing and easy to make. Eat now, thank us later. With milk, cream, sugar, white chocolate.

THE ITALIAN WAY. This is your hot weather ice cream: easy to make, and resistant to melting. With milk, cream, sugar, white chocolate, corn starch.

THE FRENCH-STYLE ICE CREAM. Rich and velvety, this is a custard-based ice cream; a tad bit tricky to make, but so much worth it. With milk, cream, sugar, white chocolate, egg yolks.

THE EASY! Crowd-pleasing and easy to make. Eat now, thank me later. With milk, cream, sugar, white chocolate.

THE ITALIAN WAY. This is your hot weather ice cream: easy to make, and resistant to melting. With milk, cream, sugar, white chocolate, corn starch.

THE FRENCH-STYLE ICE CREAM. Rich and velvety, this is a custard-based ice cream; a tad bit tricky to make, but so much worth it. With milk, cream, sugar, white chocolate, egg yolks.

or see:

The ingredients

Do not reduce or replace anything; everything is there for a reason.

• White chocolate / couverture: use real white chocolate which is made with cocoa butter; avoid the cheap fake staff which contains oil, like palm oil.  If in doubt check the ingredients on the packaging: real white chocolate contains sugar, milk powder, cocoa butter and a couple more ingredients like lecithin, and vanilla. 

• Cream (heavy cream – for double cream scroll to the right): for this recipe you can use heavy cream with 35% to 40% fat content. It is ok to use cream suitable for whipping or ultra-pasteurised cream with 35-40% fat content. Do not use low-fat cream or non-dairy cream.

Sugar: use regular sugar (white granulated sugar). Another option is raw cane sugar such as Demerara or Turbinado, which enhances the ice cream’s flavours. Do not use any other sugar or sweetener, natural or artificial, liquid or powder, like honey, stevia, golden syrup, table sweeteners, confectioner’s sugar, etc.

🇬🇧 For UK readers: if you want to use double cream -which has a higher fat content (50%) than heavy cream (35-40% fat)- stir some milk into the double cream to bring it to the right fat content. Instructions in double cream – how to use” notes in the recipe.

• Xanthan gum can be found in specialty shops, health food stores, and online. You can read more about it here.

• Milk: choose whole milk with approximately 3.5% fat. Skimmed milk, lactose-free, and non-dairy milk should not be used as they lack the necessary fat, milk proteins, and lactose that are crucial for making ice cream.

• White chocolate / couverture: use real white chocolate which is made with cocoa butter; avoid the cheap fake staff which contains oil, like palm oil.  If in doubt check the ingredients on the packaging: real white chocolate contains sugar, milk powder, cocoa butter and a couple more ingredients like lecithin, and vanilla.

• Xanthan gum can be found in specialty shops, health food stores, and online. You can read more about it here.

• Heavy cream (for double cream scroll right): for this recipe you can use heavy cream with 35% – 40% fat. It is ok to use cream suitable for whipping or ultra-pasteurised cream with 35-40% fat content.

Do not use low-fat cream or non-dairy cream.

🇬🇧 For UK readers: if you want to use double cream -which has a higher fat content (50%) than heavy cream (35-40% fat)- stir some milk into the double cream to bring it to the right fat content. Instructions in Double cream: how to use” notes in the recipe.

• Milk: use whole milk, with around 3,5% fat. Do not substitute with skimmed milk (lower fat) or non-dairy milk. You need both the fat and the milk proteins for this ice cream recipe.

Sugar: use regular sugar (white granulated sugar). Another option is raw cane sugar such as Demerara or Turbinado, which enhances the ice cream’s flavours. Do not use any other sugar or sweetener, natural or artificial, liquid or powder, like honey, stevia, golden syrup, table sweeteners, confectioner’s sugar, etc.

Overview

This is a quick overview of the recipe. If you are new to ice cream making, do read the recipe before proceeding. 

Watch us making it
The recipe
White Chocolate Ice Cream | with xanthan gum

When making ice cream prefer to weigh all the ingredients by weight. It is recommended to weigh the liquids directly into the bowl/pan as you proceed with the recipe instead of transferring them from one bowl to another because this transfer causes a small -but unwanted- loss of quantity.

If you do not have a kitchen scale, follow these guidelines:
• 1 cup (US) = 237 ml | 1 Tbs. = 15 ml

• white chocolate/couverture: measuring chocolate by volume is impossible because measurements vary depending on how finely chopped the chocolate is. What you can do instead is to calculate the number of pieces you need based on the weight of the chocolate bar as written on the packaging. Alternatively, you can measure the white chocolate melted: 200 g; 7 oz of melted chocolate is 2/3 cup (160 ml).

• sugar: measuring sugar in tablespoons is more accurate than measuring it in cups. Use a 15 ml measuring tablespoon (not a regular one); this is 13 gr of sugar. To measure correctly, each time you scoop the sugar, level it with the flat side of a knife.

• liquid ingredients: thoroughly scrape with a rubber spatula any residues left on the sides and bottom of the cup every time you measure something and empty it.

This recipe makes a 1.2 litre/quart ice cream mixture (before churning), perfect for ice cream makers with a capacity of 1.5 and up to 2 litres/quarts (like Cuisinart ice cream makers).
If you need to scale the ice cream mixture up or down, use this ratio of the ingredients (in weight only):
milk 52% / heavy cream 24% / white chocolate 16.5% / sugar 7.38% / xanthan gum 0.12%
in desired total weight of ice cream mixture.

You can adjust the quantity of the xanthan gum in the recipe to your liking, depending on the texture you want to achieve:

  • To slightly stabilise the ice cream without affecting its texture and mouthfeel much, use 1/4 teaspoon xanthan gum and decrease the sugar by 10 g (0.35 oz)
  • To create a firmer texture, which has a fuller body and mouthfeel, use 1/2 teaspoon as per the recipe.
  • For a stretchy texture similar to Booza/salep ice cream, use 1 teaspoon xanthan gum and increase the sugar in the recipe by 15 g (0.5 oz).

You can read more about it here.

You can combine double cream with whole milk to make heavy cream for this recipe.

To make the 295 g (10.4 oz) heavy cream, you need:

  • 205 g double cream (7.2 oz) (this is approx. 50% fat)
  • 90 g/ml whole milk (3.2 oz) (this is approx. 3.5% fat) *

To make the heavy cream, put the double cream in a medium bowl, then pour in the milk, a little at a time, stirring smoothly with a rubber spatula. Avoid whisking, as it may turn into whipped cream.

The resulting heavy cream has 36% fat, perfect for this ice cream. Proceed with the recipe, just as if you had the 295 g (10.4 oz) heavy cream needed. 

*this 90 g (3.2 oz) milk is extra to the 630 g milk (22.2 oz) asked in the recipe. So, if you use double cream, you need in total 720 g of milk (25.4 oz), from which:

  • 630 g (22.2 oz) are for the recipe; and
  • 90 g (3.2 oz) are mixed with the double cream to make heavy cream

This white chocolate ice cream is perfect just how it is. However, if you want to boost its flavour, read below:

  1. Substitute regular sugar with good-quality raw cane sugar, such as Demerara or Turbinado. These sugars have a natural caramel flavour which pairs well with white chocolate and brings out its flavours. 
  2. Stir some buttermilk/kefir into the ice cream mixture just before churning, when the ice cream mixture is cold. A tiny touch of buttermilk, like 50 gr; 1.8 oz.; 4 Tbs. in a batch of ice cream, will do the trick.

You do not need to head to the store and buy these ingredients only to use them in this ice cream. If you have them handy, go on and use them. If not, skip them; this ice cream will be fantastic nevertheless.

A flexible rubber spatula is good for:
-wiping the bottom of the saucepan when you cook dairy on the stovetop.
-scraping residues from bowls, saucepans etc.

If you do not have one, we strongly encourage you to buy one, preferably a flexible one. 

Instructions

Plan ahead:

Make the ice cream mixture (steps 1-3) the day before you are planning to churn it; (or up to 3 days before).

If your ice cream maker has a removable freezer bowl, put it in the freezer for the whole time indicated by the manufacturer before churning, usually 24 hours.

Step 1: Make the ice cream mixture

In this step, we use the no-thermometer method to bring the ice cream mixture to the right temperature to add the xanthan gum.

If you have a thermometer, you can skip this step and do this instead:
warm the milk with the sugar to 62ºC / 143ºF, stirring to dissolve the sugar, then pour the milk into a blender jug (or a large bowl if using an immersion blender). With the blender on, slowly sprinkle the xanthan gum, and blend for 2 minutes. Add the white chocolate, blend until smooth, then finally add the heavy cream. Proceed to step 2.

In this step, we add the xanthan gum to the blender while the blender is running. But some blenders run aggressively, splitting out their containers when you remove the cap, so first make sure that your blender runs smoothly uncovered, with 1200 ml of liquid.
Alternatively, you can use an immersion blender, keeping it submerged at all times to avoid the formation of foam on the surface.

Pour the cold heavy cream (295 g; 10.4 oz) into a blender jug (or a large bowl, if using an immersion blender). If you do not proceed with the recipe immediately, put it in the refrigerator to keep cold.

Bring the milk and the sugar to a boil: pour the milk (630 g; 22.2 oz) and the sugar (90 g; 3.2 oz) into a medium saucepan.

Warm over medium-high heat, often stirring; when it comes to a rolling boil (95°C; 203°F; or when large bubbles which pop vigorously appear on the surface; or if it starts to overflow), immediately remove it from the heat and pour it into the blender jug with the cold cream & milk.

💡Do not let the milk come to a boil before all the sugar has dissolved, or the milk may curdle. Stirring often helps the sugar dissolve efficiently.

Sprinkle in the xanthan gum: with the blender on, slowly sprinkle the xanthan gum (½ tsp.) over the surface and blend for 2 minutes to fully hydrate the xanthan gum. Do not expect the blend to thicken; it will thicken as it cools.

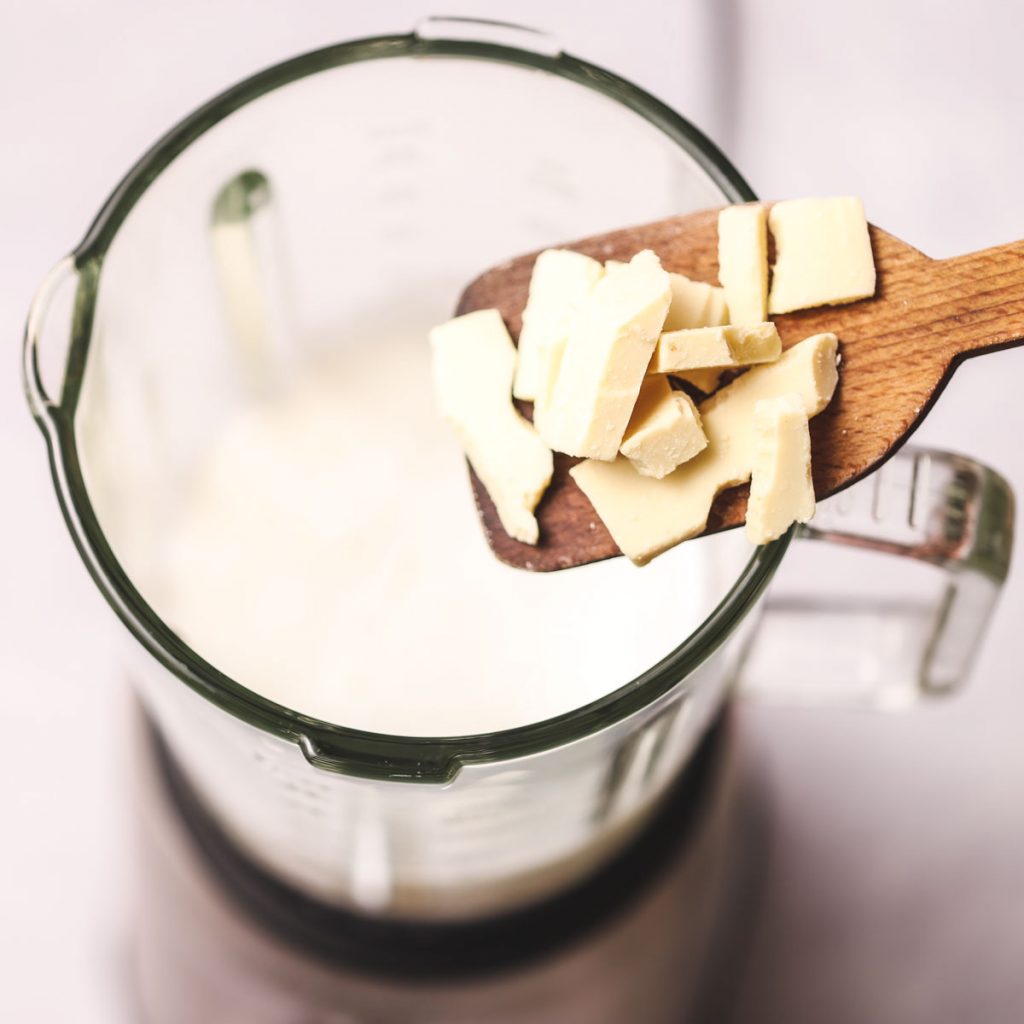
Add the white chocolate: stop the blender and add the chopped white chocolate (200 g; 7 oz). Leave to sit for one minute, then blend until smooth, stopping as needed to scrape the bottom and sides of the jug.

Step 2: Chill the ice cream mixture

Strain the ice cream mixture over a fine-mesh sieve and into a bowl.

Cool it down: prepare an ice bath by putting ice cubes and cold water in a large bowl and carefully nest the bowl with the ice cream mixture, taking care that no water slips into it. Let it cool down for 30 minutes, stirring occasionally.

Chill until completely cold: cover the bowl and refrigerate for at least 8 hours and up to 3 days. Do not rush the cooling process, xanthan gum needs 6-8 hours in the refrigerator to fully develop.

Step 3: Churn the ice cream

Check if the ice cream mixture is cold before churning it: below 12ºC / 54ºF / it feels fridge-cold when you place your index finger into it.

Prepare the ice cream maker according to the manufacturer’s instructions. 

Stir: this ice cream gets thicker when it is cold; give it a vigorous and thorough stirring to loosen it; this will allow it to churn for longer and fluff up. If it is too thick, read below:

This ice cream mixture thickens as it cools. If your ice cream mixture is too thick (like yoghurt), blend it briefly with an immersion/regular blender to loosen it before churning it.

This extra step is well worth the effort because a thick ice cream mixture makes it harder for air pockets to create into it. Not enough air pockets mean the ice cream will be sloppy instead of fluffy after churning; and hard to scoop after freezing.
So if you are after fluffy ice cream, take the time to bring the ice cream mixture to a pourable consistency before churning it.

If you feel unsure about how thick the ice cream mixture should be, prefer to err on the side of fluid and give the ice cream mixture a blend anyway before churning it.

Churn: with the machine running, pour the ice cream mixture through the canister and into the ice cream makerLeave to churn until fluffed up and creamy; depending on your ice cream maker, this can take anywhere from 30 to 70 minutes.

This ice cream is ready when it is creamy and wavy. The total churning atime depends on your ice cream maker and could be anywhere from 30-70 minutes.

To evaluate if it is ready, lift a spoonful; it should be thick enough to stand on the spoon, but it will still be soft like soft-serve ice cream. If it looks watery or starts to melt the moment you spoon it, leave it to churn for longer.

In any case, if you feel doubts about the consistency, leave it to churn for ten minutes more. But beware: at this stage, do not expect it to be like store-bought carton ice cream; for now, it should be more like soft-serve ice cream. It will firm up and become like store-bought ice cream only after it sets in the freezer.

So, stop the ice cream maker when the ice cream is smooth and pliable. If you leave to churn it for much longer, it will start turning grainy.

Warning: some ice cream makers are programmed to stop after a specific time, which doesn’t make sense because the ice cream may need to churn for more to reach its fullest potential. So, if you notice that your ice cream maker stops on its own and upon checking the ice cream, you find that it is sloppy instead of fluffy, try to turn the machine on again and leave it to churn until it reaches the desired texture.

Step 4: Put the ice cream in the freezer to set

Put in the freezer to set: before serving the ice cream or moving it to a container for storing, you have to put it in the freezer to set. To do so, turn off the ice cream maker and: 

· remove the removable freezer bowl (still filled with the ice cream) from the ice cream machine

· remove the paddle, scraping any ice cream attached to it back into the ice cream bowl 

· place it in the freezer, uncovered 

Setting time depends on many factors; see notes below for indicative times.

Serve or store: when it sets, you can serve it directly from the removable freezer bowl or transfer it to an airtight container for longer storage.

The setting time for the ice cream largely depends on the type of ice cream maker you use.

It can take :

  • 1-5 hours for removable freezer bowls (these are the ice cream maker bowls which you should pre-freeze before churning)
  • 1-2 hours for aluminium bowls (these are the bowls from compressor ice cream makers)

Note: the times given are indicative. Setting time depends on many factors.

Check it occasionally (approx. every 2 hours; or as needed) while it is in the freezer. The ice cream is ready when it has an internal temperature of -10ºC / 14ºF. If you do not have a thermometer, to evaluate if the ice cream has set, insert a round tip knife into it, all the way to the bottom: 

  • when the ice cream is ready, it feels firm as you go down, but at the same time it is soft enough to insert the knife into it; it should have this same firm consistency from top to bottom.
  • not ready yet: it will feel hard on the top and softer as you go down
  • if left in the freezer for too long: it will be too hard for the knife to insert into it and too hard to scoop out of the ice cream bowl. Do not worry, though! Read right below how to soften it.

If the ice cream stays in the removable freezer bowl for too long, it will harden and be difficult to remove or serve.

To make it scoopable again, leave it in the refrigerator to soften. That can take:

  • anywhere from 4 to 10 hours for removable freezer bowls (the ones which need pre-freezing before churning)
  • 1-2 hours for aluminium bowls (these are the bowls from compressor ice cream makers)

(Note: the time given is indicative, time may vary depending on many factors, so do check it occasionally as it sits in the refrigerator.)

When the ice cream is easy to scoop (or it has an internal temperature of approx. -11°C / 12°F if you have a thermometer), you can transfer it to another container and store it in the freezer or serve it directly from the removable freezer bowl.

Straight after churning, the ice cream has a soft-serve consistency and melts immediately upon contact with anything. This makes it impossible to serve or transfer to another container.

Putting it in the freezer after churning sets it and brings it to the right consistency, similar to that of an ice cream parlour’s.

Storing and serving

Storing: in the freezer for one month, covered well to protect it from absorbing the freezer’s smells. 

Scooping: this ice cream, like all artisanal ice cream, freezes hard in the long term. You can make it perfectly scoopable again by putting it in the refrigerator for 45-60 minuter until soft; or until its internal temperature reads -10°C / 14°F.

Make the ice cream mixture (steps 1-3) the day before you are planning to churn it; (or up to 3 days before).

If your ice cream maker has a removable freezer bowl, put it in the freezer for the whole time indicated by the manufacturer before churning, usually 24 hours.

Pour the cold heavy cream (295 g; 10.4 oz) into a blender jug (or a large bowl, if using an immersion blender). If you do not proceed with the recipe immediately, put it in the refrigerator to keep cold.

Bring the milk and the sugar to a boil: pour the milk (630 g; 22.2 oz) and the sugar (90 g; 3.2 oz) into a medium saucepan.

Warm over medium-high heat, often stirring; when it comes to a rolling boil (95°C; 203°F; or when large bubbles which pop vigorously appear on the surface; or if it starts to overflow), immediately remove it from the heat and pour it into the blender jug with the cold cream & milk.

💡Do not let the milk come to a boil before all the sugar has dissolved, or the milk may curdle. Stirring often helps the sugar dissolve efficiently.

Sprinkle in the xanthan gum: with the blender on, slowly sprinkle the xanthan gum (½ tsp.) over the surface and blend for 2 minutes to fully hydrate the xanthan gum. Do not expect the blend to thicken; it will thicken as it cools.

Add the white chocolate: stop the blender and add the chopped white chocolate (200 g; 7 oz). Leave to sit for one minute, then blend until smooth, stopping as needed to scrape the bottom and sides of the jug.

Strain the ice cream mixture over a fine-mesh sieve and into a bowl.

Cool it down: prepare an ice bath by putting ice cubes and cold water in a large bowl and carefully nest the bowl with the ice cream mixture, taking care that no water slips into it. Let it cool down for 30 minutes, stirring occasionally.

Chill until completely cold: cover the bowl and refrigerate for at least 8 hours and up to 3 days. Xanthan gum needs 6-8 hours in the refrigerator to fully develop, so do not rush the cooling process.

Check if the ice cream mixture is cold before churning it: 4ºC–12ºC / 39ºF-54ºF / it feels fridge-cold when you place your index finger into it.

Prepare the ice cream maker according to the manufacturer’s instructions. 

Stir: the ice cream may thicken slightly after chilling; give it a vigorous and thorough stirring to loosen it (or a quick blitz with an immersion blender if it is too thick); this will allow it to churn for longer and fluff up.

Churn: with the machine running, pour the ice cream mixture through the canister and into the ice cream makerLeave to churn until fluffed up and creamy; depending on your ice cream maker, this can take anywhere from 30-60 minutes; read more in How do I know when the ice cream is ready in questions & troubleshooting below.

Put in the freezer to set: before serving the ice cream or moving it to a container for storing, you have to put it in the freezer to set. To do so, turn off the ice cream maker and: 

· remove the removable freezer bowl (still filled with the ice cream) from the ice cream machine

· remove the paddle, scraping any ice cream attached to it back into the ice cream bowl 

· cover the ice cream bowl and place it in the freezer 

Setting time depends on many factors; read How long does it take for the ice cream to set in questions & troubleshooting below.

Serve or store: as soon as it sets, you can either serve it directly from the removable freezer bowl or transfer it to an airtight container for longer storing. 

Storing: in the freezer for one month, covered well to protect it from absorbing the freezer’s smells. 

Scooping: this ice cream, like all artisanal ice cream, freezes hard in the long term. You can make it perfectly scoopable again by putting it in the refrigerator for 45-60 minuter until soft; or until its internal temperature reads -10° / 14°F.

This ice cream is ready when it is creamy and wavy. The total churning time depends on your ice cream maker and could be anywhere from 30-70 minutes.

To evaluate if it is ready, lift a spoonful; it should be thick enough to stand on the spoon, but it will still be soft like soft-serve ice cream. If it looks watery or starts to melt the moment you spoon it, leave it to churn for longer.

In any case, if you feel doubts about the consistency, leave it to churn for ten minutes more. But beware: at this stage, do not expect it to be like store-bought carton ice cream; for now, it should be more like soft-serve ice cream. It will firm up and become like store-bought ice cream only after it sets in the freezer.

So, stop the ice cream maker when the ice cream is smooth and pliable. If you leave to churn it for much longer, it will start turning grainy.

Warning: some ice cream makers are programmed to stop after a specific time, which doesn’t make sense because the ice cream may need to churn for more to reach its fullest potential. So, if you notice that your ice cream maker stops on its own and upon checking the ice cream, you find that it is sloppy instead of fluffy, try to turn the machine on again and leave it to churn until it reaches the desired texture.

The setting time for the ice cream largely depends on the type of ice cream maker you use.

It can take :

  • 1-5 hours for removable freezer bowls (these are the ice cream maker bowls which you should pre-freeze before churning)
  • 1-2 hours for aluminium bowls (these are the bowls from compressor ice cream makers)

Note: the times given are indicative. Setting time depends on many factors.

Check it occasionally (approx. every 2 hours; or as needed) while it is in the freezer. The ice cream is ready when it has an internal temperature of -11ºC / 14ºF. If you do not have a thermometer, to evaluate if the ice cream has set, insert a round tip knife into it, all the way to the bottom: 

  • when the ice cream is ready, it feels firm as you go down, but at the same time it is soft enough to insert the knife into it; it should have this same firm consistency from top to bottom.
  • not ready yet: it will feel hard on the top and softer as you go down
  • if left in the freezer for too long: it will be too hard for the knife to insert into it and too hard to scoop out of the ice cream bowl. Do not worry, though! Read right below how to soften it.

Straight after churning, the ice cream has a soft-serve consistency and melts immediately upon contact with anything. This makes it impossible to serve or transfer to another container.

Putting it in the freezer after churning sets it and brings it to the right consistency, similar to that of an ice cream parlour.

If the ice cream stays in the removable freezer bowl for too long, it will harden and be difficult to remove or serve.

To make it scoopable again, leave it in the refrigerator to soften. That can take:

  • anywhere from 4 to 10 hours for removable freezer bowls (the ones which need pre-freezing before churning)
  • 1-2 hours for aluminium bowls (these are the bowls from compressor ice cream makers)

(Note: the time given is indicative, time may vary depending on many factors, so do check it occasionally as it sits in the refrigerator.)

When the ice cream is easy to scoop (or it has an internal temperature of approx. -10°C / 14°F if you have a thermometer), you can transfer it to another container and store it in the freezer or serve it directly from the removable freezer bowl.

Leave a Reply

Your email address will not be published. Required fields are marked *

This site uses Akismet to reduce spam. Learn how your comment data is processed.